Hey Stampers,
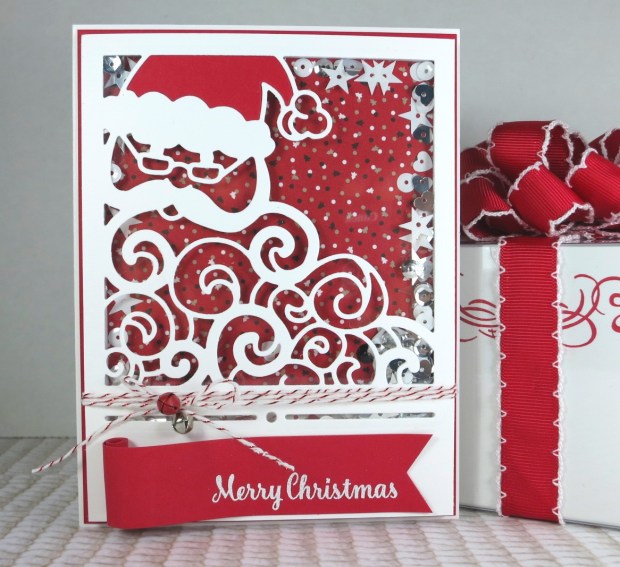
I’m here today to share another fantastic new die set from the new holiday catalog. The Detailed Santa Thinlits dies are a beautiful addition to your collection that just beg for shaker cards!

There are so many things you can do with this set (think inlaid die cutting, shakers, stenciling), but a shaker card just seemed like too much fun to pass up for me. I used two dies from this set, along with some of the new baker’s twine, and the mini jingle bells (yes, you heard that right…MINI JINGLE BELLS!!!).
If you’ve been to one of my classes, then you know I teach a simple four step process for making the shaker portion of cards: cut, cover, fill, and close. If you’ve ever started making a shaker card and poured in some sequins, only to find that you’ve forgotten the window sheet…these steps are for YOU!
Cut: I began by cutting a piece of Whisper White thick cardstock to 4×5.25 inches. I die cut the Santa square first, then cut the border second. I ran the Santa die through my Big Shot one more time with a piece of Real Red cardstock for Santa’s hat.
Cover: Next, I adhered a piece of window sheet to the back of my card front. I used my snail adhesive to inlay Santa’s hat before flipping over my card front to create the shaker portion. Use foam strips to create a border for the shaker portion of your card, fitting the corners tightly together to avoid leaks.
Fill & Close: I filled my shaker with sequins and then added a piece of the Candy Cane Lane designer series paper to seal in the goodies. You can use sequins, punched confetti, seed beads, glitter…almost anything you want as the filling for your shaker card.
I wrapped my baker’s twine around my card front and then tied the bow with two mini jingle bells. These jingle bells actually work and add a delightful little jingle to the rattle of a shaker card. I added additional foam strips to balance the height of the lower portion of my card front and then adhered the entire thing to a Real Red panel measuring 4.125×5.375. Next, I added the whole thing to my card base. In this case my card base is a 4.25×5.5 card cut from Whisper White thick cardstock.

Lastly, I stamped my sentiment and embossed it with white embossing powder. I wanted this sentiment to look like it was on a scroll (think Santa’s list) rather than a standard label, so I used my triple banner punch on one end and stamped fairly close to that end. Next, I added some adhesive (in this case tearing tape) to the back of the far left end and rolled up the paper, using the adhesive to hold my scroll in place. I adhered my scroll using my Fast Fuse adhesive on the scroll end and fast fuse on the sentiment end. That’s it!
Here’s my finished card:
I’ve included all of the supplies I used in the table below. If you have any questions about this project please leave a comment or send me a message. If this card inspires you to make something fun, I’d love to see it!
To see more fun projects, don’t forget to subscribe so you don’t miss anything!